When I first saw the new crop of Sig Sauer rifle suppressors with
their iconic shape, I knew that look was familiar. Then it hit me. It’s
almost a dead ringer for the US Navy’s Mk-54 Antisubmarine Torpedo.
Coincidence? I think not…

Coincidence? Hmmmm…….
There
are a couple of differences. Don’t run this suppressor “wet” like the
Mk-54. Rifle-sized pressures and operating “wet” don’t usually go
together, at least not safely. Another difference is that the
Sig Sauer SRD762Ti-QD
is noticeably lighter than the Mk-54, probably because of the use of
Titanium. That and the much smaller size. Last, but not least, the Sig
SRD762 is way quieter when it goes off. Oh, and as far as I know, the
Sig SRD762Ti-QD doesn’t have a magnetic detonator either.
Thanks
to some help from our friends at Silencer Shop, I got my hands on a
brand-spankin’ new SIG Sauer SRD762Ti-QD suppressor for some serious fun
(work and highly scientific testing.) As the name implies, this is a
.308 / 7.62mm suppressor, but it’s rated for up to 300 Win Mag and any
other cartridge that has same or smaller diameter and pressure.
Sig
offers two different designs of the SRD762 suppressor and two different
mounting systems, so in total there are four different models in the
SRD762 family.
There is a standard SRD762 and an SRD762Ti. The
standard model is made from Inconel 718, a Nickel Alloy Stainless Steel.
The “Ti” model uses Titanium as the name implies. Basically, you’ll
want to choose the Iconel version for heavy and abusive use. The
Titanium model uses lighter material so it can be a bit bigger without
making the suppressor heavier. Bigger means more air inside, which means
less pressure and less noise. Make no mistake, the Titanium version is
plenty durable, but if you’re going to use it in a sandbox, maybe choose
the Iconel model.
Both models are available in fixed thread mount
or QD (quick detach) mount configurations. The new QD system is pretty
darn clever, and we’ll get into that more in a minute. The fixed thread
models of the SRD762 models use ⅝-inch x 24tpi threading.
Due to
the different combinations of materials and mounting systems, the four
models have different dimensions and sound suppression performance.
Here’s a quick summary.

Tubeless
Most
suppressors have a series of baffles that are assembled and then placed
inside of an exterior sleeve or tube that contains everything and holds
the system together. Many rifle suppressors are permanently constructed
this way to handle the crazy high pressures of rifle cartridges. The
result is that part of the assembly, and associated weight, serves no
real purpose other than structural support. Additionally, the space used
by the support tube means less sound-suppressing interior volume inside
for any given exterior size. From a pure noise-reduction perspective,
the bigger you can make the interior volume, the better.

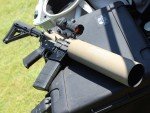
The QD package mount system is actually two pieces – the suppressor mount itself and a muzzle brake insert.
The
idea is that by constructing the entire silencer completely from the
baffles, there is more space for air inside and less weight allocated to
structural support only. This is why you’ll see a series of ridges all
along the suppressor exterior. Those are the weld joints where the
baffle rings are attached to each other. It’s a clever idea. Plus, it
looks kind of cool. The weld joints are perfectly uniform, so they don’t
look like weld joints. They look more like some form of decorative
texturing pattern.

The suppressor body is made of a stack of baffle rings welded together.
The blast chamber at the base is made from one solid hunk of metal and the baffle rings extend from there forward.
Mounting System
The mounting system on this suppressor is, well, brilliant. Here’s why.
Direct-thread
mount systems are easy and stable. You just screw it onto a threaded
barrel and start shooting. The downsides are that it doesn’t come on and
off easily and your point of impact may vary between on and off
episodes as the silencer mounts a little differently each time. Of
course, if you leave a suppressor on one rifle forever, this is a moot
point, assuming you don’t remove it for cleaning or maintenance.
Direct-thread
mounts also do a good job of keeping the suppressor perfectly aligned
with the bore, so you don’t run the risk of a baffle strike. That’s when
a very, very slight misalignment of suppressor and bore cause your
bullet to whack the inside of the silencer on the way out. That’s bad,
especially since you forked over a hefty price to the company, paid $200
in tax, and waited months to get it. Trust me, it a baffle strike
totally ruins your day. Don’t ask me how I know.
When using a
direct-thread mount, make sure that your don’t use the crush washer
that’s already likely between your barrel and existing muzzle device.
Normally, crush washers are used to “time” muzzle devices like those A2
flash hiders that come on most AR-type rifles. By “timing” I simply mean
alignment. The flat part of the muzzle brake needs to be facing the
ground while the open slots face outward and/or up. The crush washer
does just what is says, and compresses as you tighten the muzzle brake.
It will let you keep turning, up to an additional full turn or more,
once it’s tight so you can get perfect alignment of the muzzle device.
Crush washers flex and give, and, therefore, open up the possibility of a
baffle strike as they don’t provide for an absolutely square mount to
the bore line. Make sense?
When you use a suppressor that mounts
on a special muzzle device like a flash hider or brake, you get a couple
of benefits. First, it pops on and off easily so you can pack it in
your bag or switch it between guns. You can shoot unsuppressed or
suppressed at will. Second, When you remove the silencer, there is still
a muzzle device there to protect the threads and do the things muzzle
devices do like brake recoil and hide flashes. Third, a compatible mount
and muzzle device keeps your suppressor aligned perfectly with the bore
every time you install it, thereby preventing baffle strikes and
keeping your point of impact consistent from session to session.
Here’s
the trouble with most suppressor mount systems. Unless you’re using a
muzzle flash hider mount where orientation doesn’t really matter, you
still have to time the suppressor mount and muzzle device so it’s
aligned correctly. You can’t use the normal system, a crush washer, for
the reasons we just described. Instead, you use one or more flat washers
of different thickness so that when you tighten the muzzle device down,
it’s in the correct orientation. This is kind of kludgy.
Here’s
what Sig did to make a better mousetrap. The suppressor mount and muzzle
device are separate, so there are three pieces at play: the mount, the
muzzle device, and the suppressor itself. The mount has no specific
orientation. Just remove all washers from your threaded barrel, degrease
everything, add a little Rocksett, and screw it on tight. It’s
symmetrical all around, so, however, it lands on the threads is fine.
The muzzle device screws into the interior of the suppressor mount. You
can change muzzle devices without moving the suppressor mount at all.
Sig offers a variety of muzzle devices that fit into the suppressor
mount so you can decide if you want a muzzle brake or flash hider. Since
some of those devices need to be timed (oriented properly), you insert a
large crush washer between the suppressor mount and muzzle device. That
works because when you mount the suppressor, it only contacts the
suppressor mount and not the muzzle device. The muzzle device just slips
inside of the suppressor body. There is no risk of the crush washer
causing misalignment baffle strikes because it plays no direct role with
how the suppressor is mounted.

The mount itself is already installed on the rifle barrel. Muzzle devices are just inserts that fit into the mount.
The
bottom line is that you get a quick attach and detach mount. The
suppressor goes on the same way every time and in perfect alignment. You
can do whatever you want with Sig Sauer compatible muzzle devices
without worry of impacting suppressor alignment. It’s simple but
brilliant.
Large threads allow the suppressor to screw on to the
QD mount with two turns. A locking tab makes sure it won’t come off
during use. Just press the locking tab before removing the suppressor
from the mount.

The Micro-Brake installed into the suppressor mount.
While
we’re on a suppressor mount epistle, I should mention one more thing
about the suppressor mount system. It uses the new Taper-Lok system. The
complete system includes a threaded barrel with a tapered section
behind the threads. The mount has a mirror image taper and thread
pattern. The barrel and mount pressure fit together via the tapered
sections and lock with the threading. If your barrel has no tapered
section, that’s fine too, the tapered section within the mount just
presses over the ridge at the base of the threaded section. The idea is a
more solid and perfectly straight mount that won’t easily loosen. Sig
says that it takes 20% more force to remove the mount than to apply it
due to the effect of the taper, so the devices are more likely to stay
in place through heavy shooting.
OK, so that was a lot of
explanation, but the whole approach to the mount system is one of the
biggest areas of different with the Sig suppressor line.
Testing
I
tested this model on a Daniel Defense DDM4V5 300 Blackout rifle, mainly
because I wanted to hear the sound of the bolt operating. Just kidding,
but when I did start shooting Sig Sauer 220 grain subsonic 300 Blackout
ammo, that was the loudest noise – the bolt moving back and forth.
Whoa! That was cool and got major attention at my outdoor range. The
even better part was the relative instability of those big, lumbering
220 grain subsonic bullets. As soon as they struck a target, they would
tumble and go whizzing off into the backstop making all sorts of awesome
sound effects.
I also shot a variety of 300 Blackout supersonic
ammo. Of course, the sonic crack is still there, but that’s moving away
from you. The suppressor did a fine job of negating the muzzle blast, so
the shots sounded more like compressed air being released from a tank
from the shooters position.

The suppressor body locks onto the mount with a locking tab. Just press and you can then unscrew the silencer from the mount.
One
thing I did notice was a significant tightening of groups when I
mounted the suppressor. I set up a target 100 yards down range and fired
groups with both supersonic and subsonic ammunition with only the
Micro-Brake muzzle device in place. I then screwed on the suppressor and
reshot groups. Both super and subsonic groups were noticeably tighter
when shooting suppressed.
I also took this opportunity to check
for point of impact shift between suppressed and unsuppressed shooting.
For the supersonic ammo I was using, there was about a one-inch vertical
shift in point of impact downward when I added the suppressor. For the
subsonic ammo Sig Sauer ammo, there was about a ½-inch shift to the
right at 100 yards when I added the silencer.
Price
I like
this silencer, especially the mounting system. The QD mount is
forgiving when crud starts to accumulate, so you’ll still be about to
mount and un-mount it without undue effort. The separate muzzle device
and suppressor mount design is a great idea and works really well.
The manufacturer suggested retail prices of the four different models are:
SRD762 Direct Mount: $595
SRD762Ti Direct Mount: $795
SRD762-QD: $695
SRD762Ti-QD: $895
Check Silencer Shop for street prices and availability.
 Liberals want you to believe the ubiquitous assault rifle is the deadliest weapon in the nation.